I’m working towards the Siege of Coruscant so I need to fill out my Republic and Separatist collections. The Naboo N-1 Starfighter isn’t directly in the Siege but it’s an option to sub in.
My opinion of the Naboo N-1 has shifted over time even without X-Wing. I think I liked it as a kid then thought it looked a bit goofy as I got older. X-Wing has made me notice ships more in general and Din Djarin getting an N-1 in The Mandalorian has rekindled a lot of fan interest in the N-1.
Also, when Al first introduced me to X-Wing if memory serves the list he gave me had Padmé in an N-1.
Ship Thoughts
Back when I first played X-Wing my initial thought was the N-1 is more backup than a “main” ship. Playing it a bit here enforces that. Two for both attack and agility so it’s not dishing out or handling shots at an elite level. Full Throttle can enhance its staying power. Its dial is fine and the 3-Tallon Rolls give it a way to turn around and get a token. However, it doesn’t have a K-turn and I found myself missing that in practice a few times.
Even More Legacy 2.0
When I eventually get to the Siege I’ll have plenty of cards and abilities around so I stuck with Legacy again here. I hadn’t used Scum in a while so that was the opponent for the Republic.
Republic List
I put Anakin in since I like the Actis and having him with Padmé made thematic sense.
Early on the Republic plan was to have Anakin and Padmé go up the side to flank the Scum while Seven and Odd Ball went slow to delay the engagement. Anakin and Padmé should’ve turned into the middle corridor and not doing so cost them a round before they could engage.
Skull got a big Range 1, Lock, Focus, Predator attack on Seven. Without even using tokens he got three hits and a crit (Blinded Pilot). Big chunk taken out of the ARC-170 and it cost no tokens, a 1% shot. That pretty much set the tone for the match right there. And as said above, my strategy for the Republic didn’t work well.
What also didn’t work well was me trying to do something fancy with Anakin. When things were jammed towards the middle I wanted Anakin to Intuitive Controls Boost then do a 4-K-turn. But I misread the obstacles which made him fail the boost. Locked into the K-turn he went right into debris field. Then he rolled a crit against himself and the crit was a Direct Hit. Al always talks about the risk of 3-HP ships and there it is. Skull would finish Anakin in the same round. One bad move and a bad engagement and Anakin was out.
Seven managed to survive a few rounds after that pounding, including a couple at 1 HP. He kept using range 1 back arcs to get some hits in. But eventually he went down too. Down two crucial ships the Republic was never able to catch up. They took out Viktor and halved Rook and Skull to keep from getting blanked. But it was a 181-99 Scum victory that was 158-46 after Round 6.
Despite decrying the N-1 as not a “main” ship Padmé did well. I missed the K-turns but Full Throttle and Juke is a good combo and led to her getting some hits.
Also, I need to learn that if you have a giant, low initiative ship that it should take point. Rook kept bumping his own guys. Good thing for Scum I wasn’t playing 2.5 rules.
It’s been 10 years since I played this game. While these days I have played through over a dozen Zelda games there was a time when this was one of the only Zelda’s I had access to.
I won’t go over the full details in this post as they’re covered in that last one. But I’ll expand on a few topics either not covered or that I wanted to revisit.
The Minish are tiny people that appear once a century. In this game Link can shrink to Minish size; grassy fields are forests and slugs are man-sized monsters.
The first dungeon, Deepwood Shrine, is done entirely Minish-sized. The central feature is a barrel. You spin the barrel to line up with holes to advance. Then the boss is a Chuchu. But you’re tiny so it looks giant.
There’s a few times you use a lilypad to sail a puddle. As time went on I was more and more on edge for these segments. Why? I remembered at some point getting jumped by a squad of flies.
Kinstone Pieces
I complained about these in the 2014 post. The idea is NPC’s will over one half of a circular coin and you need to provide the other half. These pieces are not unique. Oh boy are they not unique. Other than plot mandated gold pieces, the optional ones are split into green, blue, and red. Green is the most common, or is supposed to be. You’ll find these as enemy drops or even in cut grass while blue and red come from chests.
And then damn if 60% of the people asking for green pieces didn’t ask for the piece with a triangle cutout. My suspicion is that many NPC kinstones, especially green ones, are randomly decided and the RNG just really loved that piece. The problem is that acquiring green pieces is also random and the RNG didn’t love giving them to me. Even at the end of the game there were a bunch of NPC’s asking for that piece.
I didn’t mind the red and blue pieces, which seemed more controlled. I did go through a stretch where I piled up double-digit copies of every blue piece with seemingly nobody wanting them. I overall enjoyed kinstones more than in 2014 and red and blue were why. If this game were to get a remake I’d like them to scrap the randomness and make sure the different pieces are more balanced.
The game’s third boss is a turning point. The first two are pretty simple. The first one sticks out for the novelty of fighting a normal enemy while tiny. But Mazaal here ups the complexity. He’s a construct with a main faced unit and two autonomous hands. To get at the main unit you first need to deal with the hands which will be both trying to crush you and sweep you. Your new bow and arrow can target a ball on the hands to stun them. Hit the ball to explode the hand.
The hand explosions will stun the main unit, allowing you to use a nearby Minish portal. This is the first of two bosses you fight in both normal and Minish size. Inside the main unit you find a machine to smack which will destroy the unit.
Temple of Droplets
A Minish dungeon. There is an ice patch with a crack in it in Lake Hylia. Link shrinks and goes inside. Inside is a full dungeon with icy floors, ice block puzzles, mini rivers to navigate on lilypads, and daylight puzzles. Daylight is used to melt ice to get stuff like keys.
It’s also used to melt ice on the element that you’re in the dungeon to retrieve. Problem is it also thaws an octorok who serves as the dungeon boss. The octorok spits giant rocks, charges into walls, forms an ice shield, and darkens the room. Quite the variety of moves.
This fight was trickier than I remembered. Though those are memories from when I played through this a few times in short order. First you need to get through some monster rooms. The last one has three Darknuts, knights with tight defenses.
Vaati himself has three forms. The second form is where it gets tricky. He is surrounded by eight arms. You need to reveal four current weak points then use the Four Sword to hit them all at once. But the Four Sword takes time to charge and then produce the claims. Vaati also keeps throwing out spikes and projectiles and if they hit a clone they all disipate.
Vaati’s third form is the last part-normal-part-Minish fight. It’s similar to Mazaal: disable the hands to get at the body. Use the Four Sword to face Vaati’s main body. It’ll shoot orbs at you which you use the sword to reflect in the classic Zelda way.
Minish Cap weighs in at -6.80, 177th out of 193, 8th percentile. It’s next to games like Sword of Mana (GBA), Phantom Hourglass, and Pokèmon Moon. That’s pretty fair. There’s some tricky spots like any game but you’ll get lots of health and restoring items.
Conclusion
This was a nice bit of nostalgia for me and it still holds up as a good Zelda game. The Minish segments are fun and creative. For the most part the game is designed in a non-frustrating manner with some rough pieces like kinstones.
Once you get to Energy Nede the game feels a bit rushed, a not uncommon trait for the end of games. After you get a Psynard to fly you’re given four dungeons to go to to get orbs to power up to face the Wise Men. But these Orbs never actually do anything. I actually forgot why I was getting them while fetching them.
After some plot points to get what you need to hurt the Wise Men they just start throwing them at you. Other games might put one or two of their new antagonists per dungeon but you’ll just start mowing down Wise Men. It just feels like during development they were like, “We just introduced 10 badass antagonists but we need to wrap the game up so start grouping them together and boss rush them out of the way.”
The first few Wise Men fights are four-on-one. This one has three Wise Men come at you and they’re decently tricky. Camael and Raphael use a lot of spells, including the all-hitting spells you have. They can spam them, they can’t be dodged, and it seemed like they couldn’t be disrupted.
Phynal – The final dungeon. I liked the puzzles here. The idea is there are colored switches. In any room you can activate one switch and the other colors are deactivated. The trick is that any colors not in that room aren’t affected. So if you activate yellow, go to a room without yellow and activate red, then red and yellow are both active. It was a lot less tedious than the Field of Wisdom.
The penultimate fight. The boss theme is Incarnation of Devil, a recurring theme through the rest of the series. Lucifer has all-hitting spells and constantly targets units close by with lightning strikes to disrupt combos and whittle away HP. He also has an instant death attack that poor Ashton kept biting it to.
The final boss. As you’d expect he has powerful spells and some new, flashy new ones. For some of his attacks it seems like some sort of angel is holding them back, a hint to the postgame content that reveals more of his true nature. Ultimately, Gabriel is like much of the endgame foes: powerful but not powerful enough to handle an overleveled, overequipped party. Ashton kept biting the dust but Claude kept himself up (and sometime Ashton) with Sword of Life.
Difficulty
Star Ocean Second Story R got a -4.55 on the difficulty spreadsheet. That’s 172nd out of 193, 10th percentile. It’s next to games like TMNT: Hyperstone Heist, Dragon Quest Treasures, and Trials of Mana. That seems a bit low since I did have quite a few losses. But the very forgiving retries and multitude of ways to become way more powerful than the enemies make it fair that it’d be pretty low.
Conclusions
This was a fun game and I see why series fans love it. The specialties system was overwhelming but it became a lot of fun to build up and interacted in a way I haven’t seen in other games. The remake introduced a lot of quality of life improvement and I’ve learned those are great ways to modernize old games. Now I’m wishing for a similar remake of SO3.
***** PLOT SECTION *****
First Assault on the Wise Men
Nall finally breaks it to the crew that Expel has been destroyed. However, there’s hope. Nede has time displacement technology that could be used to transport an intact Expel from before the disaster to the present time, saving it. Unfortunately, it’d take all the power on Energy Nede to do this and the Ten Wise Men have taken over the city of Phynal as their HQ. All the more reason to defeat the Ten Wise Men.
Claude and the Nedian Defense Force attack Phynal. They’re met with three Wise Men. They’re unable to scratch the Wise Men at all. They mock the group, explaining that their shields will block all known forms of weaponry. To further demonstrate their power, they ready a cannon to fire at a spaceship lurking nearby… the Calnus! Claude can only watch as the firepower from the Wise Men wears down the shields on the Calnus until it is destroyed, killing all onboard including Claude’s father. However, with no way to harm the Wise Men the group is forced to retreat.
This was a sidequest I found interesting. Chisato, the Nedian reporter that joins the group, points out how strange Nedian history is. It paints a picture of an altruistic galactic government but Chisato knows that there’s always an opposing view to any group. However, there’s no record of anyone that thinks the Nedian Empire wasn’t awesome.
A series of sidequests unlocks records in a computer that tells a different story. Rebellions indeed rose up against the Nedian Empire. Then the Nedians created the Ten Wise Men; they were originally a rebel suppression force before they turned against Nede.
There’s even more to the story but it’s revealed in postgame content and turns the final boss into a superboss so I didn’t trigger it.
Preparations and Rena’s Past
A woman named Dr. Mirage says she can infuse antimatter in the group’s weapons which will allow them to harm the Ten Wise Men. For that she needs them to gather data from the ruins of the Symbological Weapons Laboratory. Not only do they find the data they need but they find out about Rena’s origins.
The lab operated hundreds of millions of years ago during the Nedian Empire. A disaster befell it and it was going to self-destruct. The head of the lab, Rhima, couldn’t get out in time. Her daughter was Rena. In a desperate bid to save Rena she used an experimental time displacement device. The device saved Rena’s life: it transported her millions of years into the future onto Expel.
The Final Assault
With the antimatter weapons the group can now fight the Ten Wise Men. Several attack the other cities on Energy Nede. The heroes begin mowing them down in chunks. I mentioned in my Tactics Ogre posts how refreshing it was for the antagonists to respect and even fear the protagonists. That definitely wasn’t the case here.
Of course, it’s common for antagonists to stay cocky until the end. It just was a bit funnier in this case. These dudes have been together for thousands of millennia and nobody’s ever been able to scratch them. You’d think it would freak them out a bit more when they begin dropping like flies.
Once again the group assaults Phynel. They find the remaining Wise Men and work through them. At the end is Gabriel, their leader. The heroes fight and defeat him. However, he’s already activated the Symbol of Annihilation. This Symbol will destroy the universe by causing the Big Crunch (opposite of Big Bang, makes the universe collapse). The team is prepared with the Symbol of Divinity.
Problem is the Symbol of Divinity isn’t a complete counteraction. The energy still needs to go somewhere. And it will: to Energy Nede! Energy Nede is doomed but Nall was prepared for this. He says its penance for Nede’s past. Damn man, as bad as your empire might have been that was almost a billion years ago; I think the statute of limitations is up on that. Nevertheless, there’s no other way. The only Nedian survivors will be those in your party.
Energy Nede is destroyed. But before it is, it brings Expel back as promised.
It’s tradition in the SO series to have character-specific endings. And some characters can pair together. This game has Friendship values for each pair of characters that will determine who gets paired up. Here are the endings I got:
Noel – Happily living at a cabin on Expel with a bunch of animals.
Bowman – Back to his pharmacy. His friend Keith comes in, having finished translating the ancient text the team gave to him a third of the way through the game. I completely forgot about that. Keith says it describes some ancient society of gods. Bowman correctly guesses it’s about Nede.
Celine and Ashton – Seemingly a couple, Ashton accompanies Celine clothes shopping. A hapless Ashton tries to please Celine and ends up buying a bunch of clothes.
Claude and Rena – Back in space and Claude is back with the Federation. He’s about to go off on military exercises when Rena reveals she’s pregnant.
I mentioned it a bit last time but I’ve been liking a lot of the earlier moves over the later, flashier moves. A lot of the later moves have long windups. Enemies kept interupting them. Some later moves are good, mainly ones that are a combo themselves.
Bowman – A doctor that takes his jacket off and beats monsters with his hands. Surprisingly no healing. It’s all martial arts with some pharmaceuticals thrown in. He gets a teleport with Neck Snap, a quick attack with Poison Pellets, and Deadly Intersection has four clones converge on the enemy.
Noel – A man working at a conservation. He gets offensive and healing symbology. He’s not as good as the specialists, Celine and Rena. But he’s my second healer so it’s nice to take Rena out sometimes.
Chisato – A reporter with martial artist skills looking to be there for the story, kind of like April O’Neil. Humorously, her weapons are advanced guns but most of her move set is good ‘ole fisticuffs.
The Casters – All the casters got all-hitting spells which would pause the rest of combat to play the animation. They’re flashy and powerful. Celine’s Southern Cross especially did a ton of damage. Since the animations get repetitive the remake allows you to skip them.
This system is so deep that I still feel like I was figuring it out. But it’s very powerful. After most dungeons I’d return to town and spend time leveling up specialties and creating items. I started figuring out a cycle to use. Start with stuff like Machinery (create tools to support other Specialties), Writing (make books to level up Specialties), and Alchemy (turn Iron into more powerful materials).
Crafting makes Accessories and Blacksmith makes armor. As expected, both of them make really powerful pieces. There’s still loot in dungeons that would make the final equipment lists; my characters had a mix of crafted and dungeon items.
Customization is used to turn weapons into other weapons but it was the most frustrating one to use. I still used it since it was powerful but they made some strange choices. Each character works on their own weapon list so you have to level up Customization on everyone instead of having one or two specialists like for the other skills. The weapon is consumed even if the Customization fails or produces a worse weapon; that’s a big problem for rare weapons. And then some weapons have whole Customization branches to go down so you need to save, go down the branch, then reload to check out the other branch to see which is best.
I forgot about it for much of the game but then there’s Replication. Have a rare piece of armor or an accessory that’s really good and someone else could use it? You can just duplicate it. I put Berserker Rings (put you in permanent rage state, doubling physical damage) on all my fighters. Many endgame pieces were grayed out but they still showed on the menu so I’m not sure if something unlocks duplicating them at some point.
EXP Extravaganza
For most of the game I’ve probably been a bit overleveled. But then I got to a dungeon in the late game where I got confused, wandered around, and fought a bunch of fights while doing so. That really overleveled me. Mobs on the map usually show as purple which means you’re around their strength. From that dungeon on they show as green, meaning you’re overleveled.
Worth pointing out there’s a lot of bonus EXP in this game. Purple mobs that are close together can be fought back-to-back in chain fights. Chain fights not only give the EXP for all the fights but then give a bonus; it’s common for there to be a 50% bonus. Train is a Specialty where the character sacrifices some stats to get an EXP bonus. I turned that on all my characters outside of boss fights, getting as much as another 60% bonus. Humorously, some non-boss fights gave me more trouble than bosses because the stat penalty was that large. There’s a battle Formation you can put on to give another 50% EXP bonus. That’s a lot of bonuses.
A big improvement from what I experienced in SO3 is the bench also gets EXP: 80% of the EXP they would’ve gotten if they were in. In SO3 they got nothing and that was a huge pain. Sounds like the OG SO2 was like that too. But with everyone getting EXP I tried out all my characters. Notable that you can still put Train on your bench even though the penalties mean nothing since they’re not in combat.
I started avoiding fights when the mobs turned green. I also turned on Bodyguard, another Specialty where your non-leader characters will block mobs from getting to your leader and thus starting combat. I didn’t realize that Bodyguard will have your characters destroy green mobs outside of combat. And you still get EXP! Late in the game I was cruising through dungeons in about 5 minutes and still getting levels from them, ensuring I stayed overleveled.
Anytime an RPG requires you to be defeated it’s always tough to pull off and controversial. The ones in this game were a bit more blatant to me because of how much I was tearing through bosses. Cynne is a boss you need to get down to 25% HP or so before he uses a super move to nuke you. I tore through that 75% like nothing so just strange for him to then win and act like it was an ass-kicking. Later foes take no damage and deal tons out in return. But one foe had only single target attacks. Even when I put the controller down it took him a while to actually win because Rena kept picking everyone back up.
The plot up to this point is working up to this tower. Its aesthetic is interesting, starting as a normal medieval tower but then having futuristic cubes overtaking it. To advance you need to find a password which ends up spelling “DEATH”. On the nose but considering the whole continent is almost wiped out it’s accurate. You get revenge on Cynne here.
This guy roughed me up a bit. He’s a flying foe so some of my attacks don’t hit it. I wasn’t careful with my melee fighters and the Psynard has a good breath attack. Breath attacks can wreck melee fighters quickly with both damage and status ailments.
Field of Wisdom – I was stuck in this dungeon for a bit and good thing the remake doesn’t have random encounters or this would’ve been very frustrating. It’s a teleport maze but the twist is there’s two colors and only one is on at a time. Go through a yellow teleport and then yellow is turned off while red is on. My memory’s not great so I had to remember where each teleporter was and then try to figure out how to get to a spot with the correct color on. This was one of the dungeons that made my levels skyrocket.
***** PLOT SECTION *****
Confronting the Monster Army
When we left off a monster army had overrun the nation of Ell, where the Sorcery Globe fell. Our heroes are helping the nation of Laucer, the next target. The monster army clashes with Laucer and causes heavy casualties.
While fighting alongside Laucer the group runs into Dias again. Claude finally stops acting so jealous of Dias and the two have an amicable conversation. In general, Claude makes strides as a character over the second half that made him way less annoying to me.
Laucer is working on a giant, symbological cannon called the Laucer Hope. Claude and co. assist the insufferable boy genius, Leon, in getting materials to finish it. They bring it to the front and it unleashes a huge blast. It not only leaves a crater in the middle of the enemy’s march but there are blasts with homing capabilities that come off of it.
With that, Laucer decides to load the cannon onto a ship and sail for Ell to take the fight to the monsters. They are attacked on the way but again fire the Laucer Hope. This time, the monsters emerge unharmed! Claude recognizes an energy shield blocked the blast, something that shouldn’t exist on Expel (though he should also question how they’re able to build the Laucer Hope to begin with).
From there the battle goes poorly. Laucer’s forces are routed and Claude’s team is cast into the ocean.
Incident at Eluria Tower
The team regroups at a refugee camp on Ell. They find out the monsters’ stronghold is at nearby Eluria Tower. Cut off from Laucer and with not much other choice, they decide to storm the Tower.
Meanwhile, unbeknownst to the group, Claude’s dad, Ronyx, and the Calnus have come into the system to observe strange energy readings. They see Expel and a huge energy mass. They observe that Expel’s orbit has been changed; this is the reason for the earthquakes like the one that destroyed Kurik. This is happening because of the huge energy mass, which is on an imminent collision course with Expel…
As the Calnus is in the area they pick up Claude’s distress signal that he set on his communicator when he first arrived at Expel. They transport Claude onto the Calnus, to the shock and confusion of Claude’s comrades. Claude is distraught that he was transported away when his friends need him.
Ronyx and the Calnus crew explain that Expel is about to be destroyed and forbid Claude from returning. Claude tricks them into sending him back, lying and saying he will return. Once back, Claude throws his communicator away, preventing him from being transported back.
At the top of the tower the group finds the cause of all this: the Ten Wise Men. They have activated devices called Quadratic Keys on Expel to change its orbit to crash into the energy mass. Their goal is to pierce the energy mass to go to the planet shielded within: Energy Nede. Expel was chosen simply because it was the most convenient for their plans. They recognize Claude as an Earthling, revealing to Claude’s friends for the first time that he is not of Expel. But they also reveal Rena is a Nedian.
Claude’s group tries to fight them but are easily defeated. The Ten Wise Men transport away as they planned. On the Calnus, Ronyx can only watch as the energy mass collides into Expel, disintegrating the whole planet…
Ronyx, believing Claude dead, gives a good line here: “I turned my back on a billion people… and my own son.” This bit is a good punch to the player in a lot of ways. First, most NPC’s you’ve interacted with are dead now. This includes Rena’s, Celine’s, and Bowman’s families. I turned down several younger characters that wanted to join the party and had Claude say they were safer at home. Oops, no they weren’t.
Claude’s group was caught up in the transport beam and also end up on Energy Nede. Only Claude is aware of Expel’s destruction so it’s tough hearing the Expellians talk about telling their loved ones about this new world. They come to the city of Centropolis and meet its mayor, Nall. Nall gives a plot dump to explain what just happened.
Billions of years ago Nede was a full planet. They had such advanced technology that they ruled most of the galaxy, but did so with altruistic intent, like Earth’s current Pangalactic Federation. The Ten Wise Men rose up to try and conquer the galaxy. Their power was such that they almost overcame the whole Nedian military. But the Nedians eventually won. They weren’t able to destroy the Ten Wise Men so they sealed them away in what they thought was an inescapable prison.
After the struggle against the Wise Men, the Nedians realized how terrible their power had become. They destroyed the original Nede. They created Energy Nede and sealed it in the energy mass, effectively cutting themselves off from the rest of the galaxy.
The Nedians also forbid most military research. Now they are no match for the Ten Wise Men. Nall recognizes Claude’s group as their best chance for defeating the Wise Men. Nall assigns the team a list of tasks to prepare them for the upcoming battle, with the fate of the galaxy on the line.
This is a remake of Star Ocean The Second Story. The original was an action RPG that came out for the PS1 in 1999. It was the second entry in the Star Ocean series. Over a decade ago I did a couple playthroughs of Star Ocean Till the End of Time, or Star Ocean 3. I liked that game a lot but it’s considered controversial among series fans. I’ve always heard that SO2 was the gem of the series so now with the remake I look forward to experiencing it.
Star Ocean is a sci-fi/fantasy, future of Earth series. In SO3 you got a taste of sci-fi at the beginning then the protagonist gets stranded on a planet with roughly medieval tech and culture. Due to SO’s version of the Prime Directive, the protagonist takes a sword for fights to blend in. So for much of the game you might forget it was sci-fi. SO2 so far has had the same pattern.
Symbology is the magic of the series. The explanation is they’ve found that inscribing certain symbols/runes as tattoos gives the person magic. But it’s largely unexplained and kind of like the Force from Star Wars minus any galaxy-dominant organizations tied to it.
Basic Battle Flow
As an action RPG your characters run to enemies and hit them. Skills and spells have AoE including lines and circles. You can disrupt enemies and they can disrupt you.
Enemies also have shields that can be broken. Some attacks focus on doing shield damage. Broken enemies are stunned for a bit and take more damage: your standard “wail-on-them-now” time.
So far this game has largely been “kick ass or get ass kicked” for me. Most fights I can end with little flair but then I’ll run into a fight (not even necessarily a boss fight) that kills me before I even realize what’s happening. It’s been hard for me to follow the action a lot of the time but I think I’m getting the hang of it.
Our main character. A strong swordsman. One of his first skills has been my favorite so far: Meteor Palm. Short range but he gets a bunch of hits in and it costs low MP. He’s also gained a skill called Life Sword which does decent damage and is an AoE heal for allies. I’ve seen “sword strike that heals user” before but healing other allies is new to me. I also gave him the Meteor Ring (+1 hits) which has made even his normal attacks amazing.
Rena
Mainly a healer but she has offensive spells too. She’s the only healer I have yet so it’s either her or items for healing. Her Crush spell drops a giant iron ball on the enemy and Laser Beams spawns a bunch of lasers raining down in a circle.
Celine
Focuses on offensive spellcasting. Laser Beams, throwing fireballs, lightning bolts, the works. Oddly enough when I have trouble she’s often the last alive. The melee folks often go first due to being on the front lines. And even with less defense the AI seems to do a better job of keeping her alive.
Ashton
A dual-swordsman with dragons coming out of his back. He’s like Claude: a strong front-liner. And like Claude, so far I’ve liked his less flashy skills like Cross Slash for shields and Twin Thrust for HP.
Welch
A recurring eccentric woman in the series. She fights with a stick with a hand on it. As a comic relief character her skills are mostly doing weird things with her weapon, like slapping foes or lifting them in the air with it. I’ve struggled to use her so far. I haven’t found a weapon upgrade for her so her damage is lagging and many of her skills have a notable wind-up which leaves her open.
Tons of Skills
Hoo boy this portion is pretty overwhelming at first. There’s something like 18 skills to spend SP on for every character. Stuff like Biology, Eye for Danger, Recipes, and Technology.
These skills combine to form Item Creation Skills (ICs) and Specialties. Customization to improve weapons, Alchemy to change Iron into other materials, Cooking to make food (heal HP/MP), and many more. And then there’s Super Specialties.
And some of these skills help other skills. Like Writing makes books which are consumables to raise skills. Machinery makes tools to enhance the skills.
Anyway, I was overwhelmed when this was first introduced. But over time I’m getting the hang of it. Like most item crafting systems it can lead to powerful stuff. Better equipment, more consummables, music which can restore MP in dungeons, and more. And this remake has UI improvements to help navigate it all.
Product of the Times
Reminder the OG came out in 1999. I grew up with games like this, RPG’s made in the 90’s and 2000’s. Coming to this game new this game sticks out as a product of its time, which I don’t mean as a bad thing.
The male and female lead meet and immediately hit it off. Female lead has a power mysterious in the setting. One of the leads is possibly a prophecized hero. Characters join the group sometimes out of nowhere. An arena plotline.
The afforementioned skill/IC system is another example. Crafting systems were becoming all the rage at the time.
Dungeons and Bosses
Salva Mines
The second dungeon of the game. I really dig the theme here: Rescue Operation. Too bad I don’t think I’ve heard it since. You do go back here as part of Ashton’s recruitment.
This was a bird boss in Ashton’s exorcism sidequest. Flying foes are tricky for me. Standard attacks will have the character automatically jump to hit but special skills tend to miss because the character won’t jump for those. Zinae also cast Eruption, a circle AoE fire spell that did so much damage it was a OHKO for any of my units hit by it. It kept casting it on my controlled character and if I didn’t clear out it’d hit him and a nearby ally. I used up all my raising items in this fight and then pulled off the win.
Sacred Grounds of Linga
This area looked good being a cavern with colorful herbs growing around. The goal here was to find a new and unique herb for a doctor. There are several spots to check and most have common herbs but Claude will still declare it’s good enough only for Rena to say she sees that in every store around. The dungeon also had lots of stone bridges and crisscrossing paths which made exploring it all a bit confusing for me.
Enemy Leaders – These are non boss fights but they can sometimes be as tough as a boss fight. One of the enemies is bigger and they have a passive buff/debuff that makes things more difficult for you. It can be an attack buff for all foes, movement debuff for you, you gradually lose HP, etc. And they’re generally tougher versions of a monster around the area. On the flip side, if you Break or KO them then all enemies get Broken too. Thus, I tend to focus Break attacks at the Leader.
The game starts with a summary of SO1. The Pangalactic Federation was in a war against the Lezonians. Ronyx Kenny was part of a team that saved the underdeveloped planet of Roak from a Lezonian plague. Then his team defeated Jie Revorse who had invaded Earth. Ronyx was a party member in SO1. For his efforts Ronyx was promoted to admiral at an unprecedented young age.
About 20 years after SO1 Ronyx is still an admiral and his son, Claude, is an ensign. Claude is struggling to escape his father’s shadow and prove himself. They are both stationed on the Calnus. They get a mission to investigate ruins on the planet Milokeenia. They come across a strange device. Claude hot-headedly ignores his father’s warnings and gets too close to it. There is a burst of light and Claude disappears.
Claude wakes up in a forest. He sees a young woman being attacked by a monster. He uses his Phase Gun to defeat it. The young woman introduces herself as Rena and takes Claude to Arlia, her hometown. Claude learns he’s on an underdeveloped planet named Expel. The Federation has its own version of the Prime Directive (called the Underdeveloped Planet Preservation Pact or UP3). Thus, Claude needs to keep a low profile. He proves to be very bad at this.
Star Ocean Second Story Claude carelessly uses his Phase Gun in front of a crowd pic.twitter.com/rS0mOGzTVo
Claude’s use of the Phase Gun and his strange (for Expel) clothes make several people, including Rena, mistake him for the “Hero of Light.” In a time of need for Expel the Hero of Light is said to come save them wielding a Sword of Light. They believe his Phase Gun is the Sword of Light.
And Expel is indeed in need. A meteorite fell recently and since its falling calamity has struck the planet. Docile animals become ferocious monsters. Horrible quakes have been happening. While nobody knows for sure that it’s because of the meteorite its timing has caused most to believe it’s the issue. Thus, the meteorite has become known as the Sorcery Globe.
Stranded and with his communicator not working, Claude decides he needs to seek out the Sorcery Globe as it’s the only extraterrestrial activity on the planet. Rena decides to help him. She was adopted by her mother, Westa, at a young age. She also has healing symbology which is unique to her. This has left her with many questions about herself and her history and she goes with Claude thinking she will find answers.
Various Calamities
Before Rena goes with Claude she is kidnapped by her childhood friend, Allen. Allen has a strange stone that dramatically changes his behavior, making him into a tyrant. When confronted by Claude the stone transforms him into an ogre. Defeating him breaks the stone and turns Allen back to normal. He apologizes for his behavior.
Claude and Rena visit the port town of Kurik. As they wait for a ship a massive quake and ensuing tidal wave hit the town and destroy it. Now I’m not usually a stickly for voice acting but it was pretty goofy here. In the immediate aftermath of the carnage with people on the high ground looking for lost loved ones Claude and the ship captain have a conversation. Their tones and words would be more fitting if the ship just lost a bunch of cargo than the catastrophe that just happened. Anyway, refugees from Kurik can be seen in the other towns from then on.
Ashton’s recruitment is hilariously insane. Claude’s group learns about a two-headed dragon in the Salva Mines. They go to confront it but find another warrior, Ashton, there first. Now the reasonable thing would be to help him. But they decide there’s not enough room despite the passage being as big as any of the other fights you have in the mines. Not content to stand there they begin cheering him on. However, the cheering distracts Ashton and allows the dragon to strike. Instead of biting him there’s a flash of light. When the light clears the two dragon heads are now attached to Ashton’s back.
Ashton is understandably freaked out by this. He demands the group help him exorcise the dragon. The group is weirdly reluctant at first but eventually agree. Rena names the dragon heads Creepy and Weepy. Then the group seems more concerned with Creepy and Weepy than Ashton himself, which baffles him.
Some sidequests show how to exorcise the dragons but also reveals they will die if it happens. Over the course of the sidequests Ashton becomes used to Creepy and Weepy and decides not to go through with the exorcism. Nevertheless, there are times when the two dragons get rambunctious or even argue with each other and Ashton has to deal with two dragon heads on his back swinging around.
Claude, Rena, and Dias
I don’t mind some romance in games but Claude and Rena have been annoying so far. The biggest reason is they spend a lot of time getting jealous and pissy with the other. Seeing the other with someone of the opposite gender usually does it.
Rena has a childhood friend named Dias. Dias is a master swordsman and famous on the first two continents. Claude quickly considers Dias a rival. And every time the subject of Dias comes up Claude turns into an asshole, snapping at everyone, especially Rena.
And for a while Dias comes up often. Claude and Rena will be having a good chat and then she remembers something about Dias and it goes downhill. The other party members will bring up Dias out of nowhere, seemingly unaware of how it affects Claude.
Moving Closer to the Sorcery Globe
Claude and Rena meet a symbologist (basically a mage) named Celine. Celine has them spelunk in the Krosse Caves and they find a mysterious text. They believe it may have something to do with the Sorcery Globe. A famed linguist resides in Linga who may be able to decipher it.
The group goes across the ocean to the kingdom of Laucer where Linga is. In Linga they meet a doctor named Bowman. After a series of tasks Bowman introduces them to the linguist, Keith. Keith agrees to begin translating the text but it’ll take time.
The team also wants to get passage across the ocean to the kingdom of Ell. Ell is where the Sorcery Globe fell. Reports from Ell have gotten worse and worse. Eventually reports are that monsters destroyed the kingdom. After that monsters are on their way to Laucer. Citizens in the capital city are evacuated into the castle and all Laucer’s forces are sent to the Front Line Base to prepare for the assault.
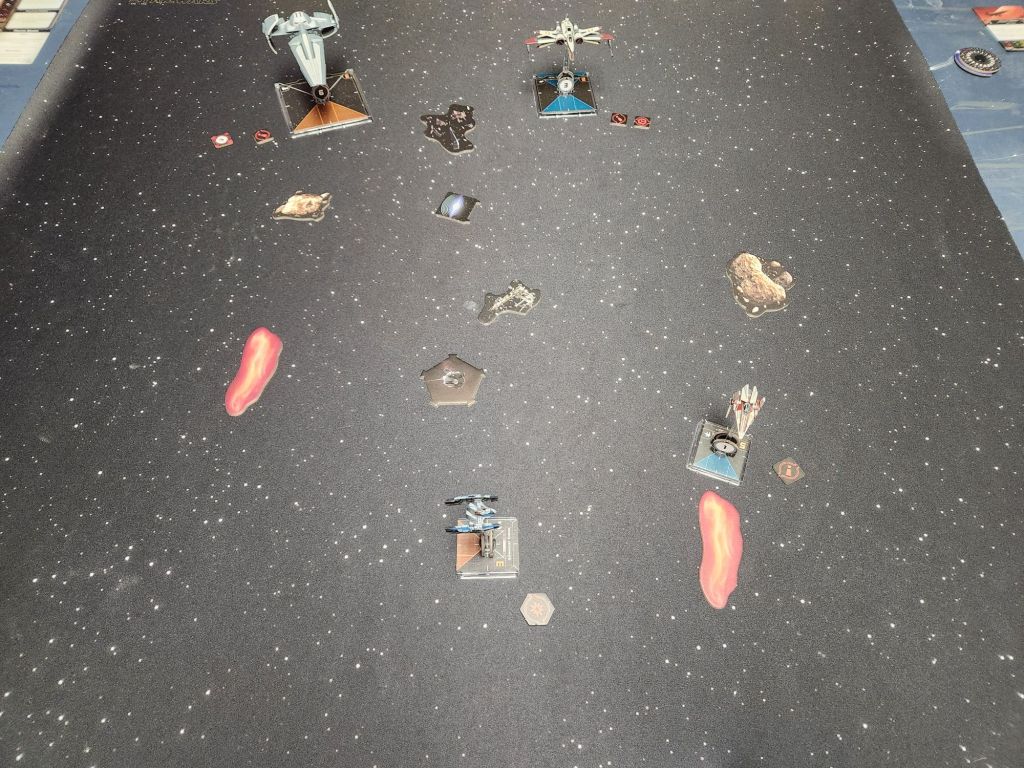
I remember using the TIE Bomber in the 2005 iteration of Star Wars Battlefront II. It was probably the second best bomber in that game. For space battles I’d use the bombers because they seemed like by far the fastest ways to end the space battles, which weren’t particularly balanced. I also remember their brief appearance bombing asteroids in Empire Strikes Back. I don’t remember much about them in Rebels but looks like they made a few appearances in that show. Maybe sometime I should rewatch Clone Wars and Rebels now that I have more of an eye out for ships.
Anyway, I was pretty excited to give them a spin in the miniatures game.
Ship Thoughts
I like how they made the bombers reflect their factions’ tendencies. The TIE Bomber is more fragile than the Y-Wing like how TIEs are usually fragile. But it’s also nimble for a bomber and its chassis ability allows for using bank templates for dropping bombs which seems useful. It gets two agility and six hull so it can still stick around for a bit.
More Legacy 2.0
Once again I felt more like trying out a Legacy list to limit the number of cards and not worry about objectives.
My flavor text thinking for this match was Empire Strikes Back when the bombers are looking for Han and the Falcon. Of course, they don’t actually directly confront them there nor does the Falcons have any backup. So some liberties were taken.
Empire List
Not only did I get both Bombers from the pack in there but I fit in a TIE Defender, one of my favorite ships.
For setup I purposely used only asteroids to further fit the ESB vibe. Rebels had only Han with initiative over 2 and they “won” the opening roll so they had to place every ship other than Han before the Empire. Empire decided to stay together as a swarm but place away from the Rebels with the goal to flank them.
Fireworks began on Round 2. Han almost erased a TIE Fighter with a hit and crit (Fuel Leak). Not a lot of paint the rest of the round though which led to that being the only hit.
But Han and one of the X-Wings were left in a bad spot. The TIE Bombers flew ahead and now had their backs pointing to where the Rebels were going. I still suck at flying large ships and Han was stuck between asteroids and was also blocking the X-Wing a bit. This was the beginning of a big game for the bombers. They dropped a Proton Bomb each and both bombs hit both Han and an X-Wing. Only shield damage but that’s four damage without shooting.
Poor Han also had an unlucky 11% miss on a Bomber despite having a lock and his special ability. The poor luck was made up for when an X-Wing did an unexpected tallon roll and erased all of Dobbs’ four shields with a range 1 unmodded attack, 0.5% chance.
The Y-Wing tried to anticipate the Defender’s favorite move, the white 4-K turn. It laid a couple Thermal Detonators. But I decided the Defender would see that coming so it regular turned instead.
The Falcon had a ton of trouble. It’d bump other ships and get stuck in the middle where all the TIEs could get shots on it. Then the TIE Bombers hit it and the Y-Wing with another salvo of Proton Bombs they couldn’t avoid due to the asteroids. Han went down and it was downhill for the Rebels from there. They took out one TIE Fighter and almost took out Dobbs. But Dobbs lived and then an X-Wing and the Y-Wing went down to seal the victory for the Empire.
Match Pictures
SetupAfter Round 1After Round 2After Round 3, Proton Bombs behind FalconAfter Round 4, Han stuck bumpingAfter Round 5, Falcon and bottom TIE Fighter outAfter Round 6, Y-Wing and bottom X-Wing outEnd of Game
I did another round of synthesis grinding. It sounds weird but it really is part of the fun for me. I really liked the team I ended up with and I like having 8 monsters instead of 3 that I’ve been building all game. They were all pretty powerful but man they could burn through MP in a hurry.
The first of my final team to be synthesized. Pazuzu is a demon monkey that debuted as a boss in the final dungeon of DQ2. He’s been a single-target specialist for me with the fiery Kafrizzle and dark Kazammle. Then I synthesized him into a new Pazuzu with some more endgame spells.
With a name like that he has to be a healer. These large green slimes debuted in DQ4 along with the blue normal King Slimes and have appeared in every main DQ since. He has Health Professional to heal better and with less MP. Omniheal isn’t a full heal like in the past but still powerful, and necessary in the endgame.
They and their lesser cousins, Liege Lizards, debuted in the lost DQ, DQ10. But they appeared in DQ11 which is what I know them from. I always thought their design was cool and they were tough. This guy had some various breath weapons and debuffs.
The upgrade of my old friend, Orochi. King Hydra debuted in DQ3 along with Orochi and was the first boss in the final boss rush. Hydra here had a ton of HP and was difficult to bring down. He also had a lot of breath weapons and a strong physical attack.
A leopard swordsman. He was a major late-game boss of DQ9 who then was brought back for the final dungeon. Even though physicals aren’t as good in this game his attack was really high and he had great physical attack skills. And if those didn’t work he had Kaswooshle for powerful AoE wind damage and a surprisingly high amount of MP to cast it.
In DQ8 he was an ordinary dog that touched a cursed scepter and turned into a monster. He would be the third holder of the scepter the heroes pursued and was a late-game boss. Here he had a bunch of powerful attack spells, debuffs, and some breath weapons. Included was Kacrackle, the top ice spell, and Crackmeister (ice attacks do more damage and cost less MP). He was damn lethal with it.
Look at this guy! Looks like a badass slime knight warrior! He debuted in DQ9 in high level grottos (random dungeons that make up most of the postgame). He’s also been a fan favorite for players of this game: I see so many posts with him on a team. I guess he dominates the meta. He has Health Professional like King Cureslime but also Tactical Trooper. That sometimes gives him an extra turn and is usually reserved for Large-size monsters that take up two slots but he has it as a Small. My version also had powerful attacks like Gigagash (AoE lightning sword strike).
Here we go! This is part of the reason I love the DQM games: getting up to and including final bosses. Orgodemir here is the Demon Lord and final boss of DQ7. My version had powerful AoE spells and a single-target Kaspashle, a water spell. He had the most MP on the team and could actually bust out his attacks without running out quickly. He also has Disruptive Wave, a mainstay for final bosses, which removes buffs from foes, including Frenzy which had given me trouble on earlier bosses.
I really enjoyed the Upper Echelons. It was a good kick right out of the gate when I went to Upper Indulgence thinking cake land would be a piece of cake. Then the pastries started using stuff like Blessed Breath on me doing huge damage and inflicting confusion. But they also give a lot more EXP so my team gained power to stand with them. There’s lots of cool monsters to scout too.
The DQ4 references return as most of the Upper Echelon areas have a boss from DQ4. Specifically, the four guardians that protect the barrier to the final dungeon of DQ4. Each Circle has its own plot spanning its Lower, Middle, and Upper Echelons and they get concluded in the Upper.
Special mention to Aamon who is a figure DQ fans love to hate. In DQ4 and this game he tried to orchestrate Rose’s murder to drive Psaro over the edge. In the DQ4 DS remake they added Aamon as a postgame bonus boss even though you already killed him once. Here you get to have Psaro and Rose personally confront Aamon. But not before going through his water-based keep. Something about water dungeons in video games man, they tend to have frustrating puzzles. I spent a ton of time trying to figure it out.
Upper Circle of Conquest
The Upper Circle of Conquest is the final area. It’s a 3D remake of the portion of Nadiria we see in DQ4. It also has the barrier towers and four new bosses for them. Then the final dungeon is the Conquerer’s Keep, the same final dungeon as DQ4. At the entrance you fight Dolph the Destroyer, the elder brother you’ve heard so much about. Straightforward fight.
The Keep is a dead ringer for DQ4’s final dungeon. At the end you finally confront Randolfo the Tyrant in a two-form final boss fight. His first form is straight-forward. Powerful attacks but nothing Omniheal can’t handle. Issue is he has a lot of HP and resistances to fire and dark, two of my best single-target elements. He was weak to ice in both forms so Evil Sir Leopold with his Kacrackle had a field day.
But he still took a bunch of punishment and my team tore through their MP. Good thing I do like a lot of RPG players do and hoard high-end items. I busted them out here. DQM games are unique in that the monster master is considered to use the item so one of your main party doesn’t use an action for the item; the item is like a bonus action.
The second form was tougher. Better attacks including his own Kazammle which did a ton of damage. Wave of Panic is a party wide debuff of all stats. One of his weaknesses was Agility so my healer always went before him. I didn’t want to risk the dreaded turn-based boss-double-turn-before-healer so I’d always use a Panacea to restore my healer when his Agility was debuffed. He’d also use Katox to poison the group. Not super threatening on its own but I was often too busy to heal it and that damage adds up over time.
As is tradition he’d use his own Disruptive Wave. I usually praise buffs, especially Oomph, but my team just ended up in a spot where buffs don’t do a lot for them. In most games Disruptive Wave really sucks to face but ironically here it was a waste of a turn for him.
Ultimately, having a team of 8 well-built monsters and a pack of items to restore MP and status was too much. I was never really in danger of losing.
Difficulty
DQM The Dark Prince gets a 9.30 on the difficulty spreadsheet. That’s compared to a mean of 24.49 and a median of 15.11. It’s 121st out of 192, 37th percentile. It’s next to games like Dragon Quest V, Metroid Prime Remastered, and Final Fantasy X. That seems right on the money to me. Like any game it has some tricky spots but most of the game was cruise control.
Conclusions
This was a great game. For reasons I can’t explain, the Joker games didn’t quite capture the magic of the first two Dragon Quest Monsters games for me. But this one did. I loved synthesizing the monsters and honestly could spend a bunch more time getting final bosses if I had more time. Building the team is the highlight of these games and it was a ton of fun. The plot didn’t grip me a ton but it was cool to see Psaro’s point of view on the events of DQ4.
We see Psaro’s point of view of finding Estark. As in DQ4, Psaro is too late to get to Estark. The Hero and his party destroy Estark. Then Psaro is alerted that Rose is in trouble. Before he and the Hero can confront each other, Psaro leaves to help Rose.
He returns to Rosehill Tower to find Rose is fine and Toilen is back. Rose says Toilen arranged her kidnapping. Toilen says he was too late to prevent Rose’s kidnapping; this Rose is an imposter. Given how Toilen left and Psaro’s hatred of humans I figured he wouldn’t believe Toilen. Hoo boy, there sure was a scene after that.
Toilen leaves in anger. Psaro and Rose sit down to have dinner but it comes out that this Rose is, in fact, an imposter. Psaro rushes to find the real Rose. As in DQ4, he is too late. Psaro cuts down her tormenters but it’s too late for her and she dies in his arms, pleading for him to give up his quest for revenge.
He does not give up. Filled with wrath he uses the Secret of Evolution, turning himself into his final boss form from DQ4. It’s interesting to see this from Psaro’s perspective. He ramages through Nadiria, destroying many of the innocent monsters he helped in this game. Then he is put down by the Chosen. Psaro is killed.
But that’s not the end of this story. Toilen has some Sands of Time from the beginning of the game. He uses it to turn back time to the pivotal choice. Knowing what will happen, Psaro now knows to believe Toilen. They defeat the imposter and rush to save Rose. This time, they succeed and Rose is saved. Toilen reconciles with Psaro and rejoins him. And Psaro is convinced to abandon the Secret of Evolution and his grudge against humanity. He still wants to go after his father, Randolfo, though.
Psaro makes his way to the Conqueror’s Keep to fight Randolfo. He is met at the entrance by his elder brother, Dolph, and a horde of monsters. Psaro is outnumbered but the Chosen show up to help! It’s a cool scene to see Psaro fighting alongside the Chosen. That said, the Hero tells Psaro in no uncertain terms that they’ll fight each other some day. I always imagined the Hero would be perpetually pissed at Psaro but it actually makes less sense in this version of the story since Psaro didn’t burn down his hometown.
Dolph talks a ton of shit to Psaro. After the gameplay fight, he uses a spell to banish Psaro’s monsters so they can fight one-on-one. But Psaro is still cursed and unable to harm Dolph. Dolph’s talking all big but he didn’t even put the curse on Psaro but it effectively wins the fight for him. Anyway, the Hero cuts Dolph down. Psaro enters the Keep.
Psaro finally confronts Randolfo the Tyrant. Randolfo congratulates Psaro on getting so far and offers for Psaro to join him. Psaro refuses. The fight, and Psaro comes out on top. Randolfo dies gracefully. He removes the curse from Psaro and says Psaro is the rightful ruler of Nadiria. His first act as ruler should be to finish Randolfo. But Psaro is no longer so bloodthirsty nor does he want the throne. As he dies Randolfo warns that if Psaro doesn’t take the throne some powerful monster will.
Epilogue
The Zenith Dragon congratulates Psaro and his party on their victory and flies them back to Rosehill. ZD asks Psaro if he will renounce his monster blood to live as a human but Psaro refuses. ZD understands that Psaro has learned how to be himself. With Rose and Toilen accompanying him Psaro intends to continue training his monsters and go on more adventures.
One thing that’s struck me is all the QoL that’s been introduced since DQM1. I still love DQM1 and 2 and would like to play them again sometime but there’s some noticeable improvements here. The biggest improvement is in synthesis. Since DQM1 there was either genders or polarities that limited what monsters could be synthesized. There are already complex recipes to get rare monsters but you had to waste additional time every step of the way to make sure you also have monsters with opposite genders/polarities. Now they finally got rid of that so you can synthesize any two monsters.
There’s some features common to other games. Fights can be sped up. The Zoom (teleport) menu has been given its own button and there’s plenty of checkpoints to teleport to. There’s an in-game monster encyclopedia that also keeps track of what monsters’ you’ve ever had. You can teleport right to the Altar of Amalgamation where synthesis is done. While synthesizing the game highlights if a combo is part of a unique combination that results in a new monster.
The Attackers – Physical attacks aren’t as powerful as I’m used to in DQ’s. Usually your offense against bosses is Oomph the attackers, Sap the boss, and go to town. Sap doesn’t seem like it has as high a hit rate. And even fully buffed attacks may not do as much damage as a powerful breath weapon or spell. That’s not to say they’re worthless, just not the stars I’ve come to expect. New examples: Grim Baron (zombie baron on horse), Great Sabrecat, Axeraptor (dinosaur carrying axe).
The Wizards – So the role of offense goes to dudes like these. I got the high level Frizz (single target fire) spells on Pazuzu (demon monkey). They do a ton of damage. New examples: Silvapithecus (lesser demon monkey), Abracadabrador (wizard dog).
The Healer – I’ve been upgrading my healer and healing skills. Multiheal with Health Professional (passive that lowers MP cost but raises effectiveness of healing) has finally made healing worthwhile. And my healer has some attacks like Kazam (single-target dark attack) and Freezing Blizzard (mid-level ice breath weapon). New example: Flutter Slime (slime with wings).
After visiting all the Lower Circles of Nadiria you get access to the Middle ones. As expected, it’s a notable step up for the monsters. You also get to choose what order you go through them in. The Middle Circle of Conquest was especially tough. It had tough monsters like Ursa Major, a bear that acts twice and hits like a truck. The boss at the end of Middle Conquest took me to the brink. He had a variety of attacks so I couldn’t nerf him with one debuff. Then he entered a Frenzied State which made him a ton more dangerous. I barely scraped through with a Silvapithecus casting Kafrizzle for high damage while everyone else dedicated to keeping it alive.
An update was made to the game later to show how dangerous each circle is and sure enough Middle Conquest is the toughest. After that, the others were a breeze. Nevertheless, you get a wide variety of new monsters. Middle Caprice really stuck out to me. It’s a desert with lots of sandstorms. It has a variation of the classic Golem enemy: the Stone Golem. And it has a surprisingly sad plot: the Stone Golems are forced to serve an abusive master who works them to death and revives them to do it again. You learn of this in a giant Stone Golem graveyard with noticeable Golem remains all over.
The trend I was noticing with bosses is that many aren’t too bad unless they enter a Frenzied State, giving them huge stat bonuses and an extra action per round. One exception was General Chayne in Diabolic Hall. He’s tough without Frenzied. He has strong physical attacks that hit the whole group. The worst is his Hatchet Man. Hatchet Man is less accurate but when it hits does an automatic critical. His version hits the whole party so anyone it lands on gets hit hard, might even be a OHKO. And Blunt doesn’t do enough to take away from it. But on my second try I found his accuracy can be lowered which made most of his attacks miss. That gave me the time needed to get hits in and end the fight.
A time honored tradition for me. As I mentioned in the last post synthesis is the pathway to a lot of rare monsters but it’ll take some doing. So in these games there’s always a point where I want certain monsters and grind through a bunch of synthesis to get them. This isn’t necessary as just going through synthesis and scouted monsters will probably get you to victory. But getting rare monsters is part of the fun.
Here’s the list of monsters I ended up with after the first great grind: Great Dragon (a badass looking European style dragon), Orochi (a multi-headed dragon and my old friend from DQ3), King Slick Slime (brown melty king slime), Flutter Slime, Pazuzu (demon monkey boss from DQ2), King Foo Dog (spellcasting dog and enemy from DQ4), Fright Knight (skeleton knight first appearing from DQ7), and Dark Sabrecat (dark version of the ferocious cat from DQ5).
***** PLOT SECTION *****
A Parallel Journey
The plot begins to parallel DQ4’s. Monsters that were bosses in DQ4 begin joining Psaro. The bosses of Chapter 1 with Ragnar join Psaro and help him out a few times. The Flamethrower (toga wearing monster that throws flame) that is fought to recruit Torneko is recruited by Psaro after Psaro helps him in a rebellion against a dragon that has been sacrificing monsters. The Restless Armor (living suit of armor) that guards Rose in DQ4 is helped by Psaro and then comes to Rosehill Tower to serve his purpose of guarding Rose.
Events that Psaro interferes in DQ4 also happen. Psaro enters the human fighting tournament in Endor until he learns that Zamoksva has heard about the Lord of the Underworld. He leaves the tournament and imprisons the people of Zamoksva just as he did in DQ4. He acquires the Armlet of Transmutation, needed for the Secret of Evolution, from the monsters that stole it.
Then there’s the attack on the DQ4 Hero’s hometown and murder of all he holds dear. I was wondering how they’d handle this. The twist is that while Psaro is there he doesn’t launch the attack. Instead, his elder brother Dolph leads the attack but for some reason says that he’s Psaro. This leaves DQ4 Hero thinking it was Psaro.
In the Circle of Corruption Psaro meets a strange man named Ludo who is the warden there. Ludo guides Psaro to memories in the area. The memories show of devastation wrought by a Zenithian named Azabel. She stole the Secret of Creation and created three abominations. One of these was Estark, the Lord of the Underworld. Just like in DQ4, Psaro decides he wants to revive Estark and subjugate it to wage war on humanity.
The Zenith Dragon confronts Psaro. ZD wants Psaro to work with the Chosen Ones from DQ4. Psaro refuses. ZD gets angry and banishes Psaro from Zenithia. Then Toilen gets mad at Psaro. Makes sense; Toilen is a human and Psaro’s going on and on about wanting to bring humanity down. Toilen leaves Psaro.
Rose is sad to see her friends feud and is worried Psaro is on the wrong path. We see her at her window saying lines seen in the dream sequences of DQ4, asking for someone to stop Psaro. Nevertheless, she still accompanies Psaro in his journeys. Many of their trips are helping innocent monsters which she supports.
Psaro learns that another also seeks Esturk: Zangiel the Omniarch. Zangiel is lord of monsterkind in Terrestria (the overworld of DQ4) in a similar way that Randolfo the Tyrant is in Nadiria. Psaro goes to Zangiel’s Diabolic Hall to face him. He first faces his servants, including General Chayne. General Chayne found a young Psaro at the beginning of the game and helped him. Psaro defeats Chayne and goes to face Zangiel.
To his suprise, Zangiel pledges his allegiance to Psaro. Zangiel has been waiting for Psaro’s return. Zangiel has also become old and soon dies. The monsters of Diabolic Hall pledge themselves to Psaro. This explains this being Psaro’s stronghold in DQ4.
In the Middle Circle of Conquest Psaro meets Ludo again. Turns out Ludo is Psaro’s younger half-brother, this time by Randolfo and an elf. Ludo has established a haven for weak monsters. However, a wyrmhole dragon named Wyrmsworth reveals Ludo’s true intentions. He wants to destroy Terrestria, Nadiria, and Zenithia to create a new world as he sees fit. He wants this because of all the despair in the world.
Psaro is forced to have his monsters fight Ludo and strike him down. Ludo harbors no regrets and is glad Psaro is so strong. He hopes Psaro will see things how he did someday.
Dragon Quest Monsters: The Dark Prince was released in late 2023. Its the 7th game with the DQM name but referred to as DQM3. The ones between DQM2 and 3 are Caravan Heart and the Joker games, which are sort of spinoffs of spinoffs. DQM3 celebrates the series’ 25th Anniversary and is the first one to be officially released outside Japan since 2011.
Psaro and DQ4 Recap (Spoilers for DQ4)
Past DQM’s sometimes had you play as a young version of a past main DQ, like Terry from DQ6 being the PC of DQM1. This time, we get a villain. Psaro, the antagonist of DQ4, is our avatar.
Quick recap of Psaro’s role: he was the Master of Monsterkind and led a campaign to exterminate humanity, who he saw as evil. His hatred was driven by how humans treated his elf friend, Rose. Rose’s tears were rubies so greedy humans tormented her for them. Rose is killed during DQ4 which makes Psaro desperate to end humanity, even losing his sense of self to do so.
Once in a battle, DQM acts like any DQ game. It’s how you build your party that’s different. Your party is made up of all monsters who you recruit and synthesize. Recruiting is done through a “Show of Force” where your party builds up a percentage chance through their Attack or Wisdom and then rolls a dice against the result. This Show of Force was introduced in the Joker games and I think it was a big improvement. So far I’ve found the odds very reasonable and I can get most of each monster type in an area without too much trouble.
Synthesis has been around in some form since DQM1 and it’s part of what makes the series fun and unique. You combine two monsters to make a new one. The new monster’s stats and skills are determined partially by its parents and by its type. Finding new types is a big part of the fun and challenge. Through this system you can get anything up to and including the final bosses of the DQ main series. But to do so you’ll have to do a bunch of synthesis as rare monsters are required to make the bosses and they have their own requirements. I’ve seen detailed recipes posted online on how people made rare monsters for this game.
The Monsters
One big change for this game compared to previous ones is the size of the party. Four-monster active party instead of three. I like a party of four but it is a bit weird now to not be so restricted.
In addition, you get a full reserve team. I keep raving about using my bench more in DQ games and this one is no exception. I’m loving hauling around eight monsters and switching them in and out. And with the synthesis and building skill lists, it means more synthesis and more skills.
The Heavy Hitters
SkeletonBriny BroncoCannonbrawler
No matter what, you gotta have some dudes laying on the hits. Some of these guys have also had status hits to inflict sleep or poison. Examples: Skeleton(has a sword), Briny Bronco (seahorse with attitude), Cannonbrawler (small cyclops riding a cannon)
The Healer
HealslimeSnowmangler
I’ve only built one dedicated healer and with only a single target moderate heal his healing hasn’t kept up. But it’s useful for long treks. And eventually I figure the healing will catch up. Examples: Healslime, Snowmangler (snowman slime)
The Buffers
Box SlimeSlick Slime
Buffs are powerful in DQ and that holds true here. Oomph (single target attack buff) and Oomphle (full party version) are great. Kabuff (defense buff) keeps the team up. Oomph also raises Scout chance quite a bit to recruit new monsters. Examples: Box Slime, Slick Slime (goopy maroon slime).
The Debuffs – My debuffs have been spread among the team. Sweet Breath (AoE sleep) has been great. Early on I used lose-a-turn moves like Sultry Dance and War Cry. Use on big groups and they come in handy. Sap (defense debuff) and Blunt (attack debuff) are great for bosses.
Party Damage
Drake SlimeHam ShamwitchMeowgician
These have also been spread a bit. I’ve found a lot of breath weapons. Chilly Breath did good damage early on but is starting to fade. Some spells like Woosh and Sizzle have made it in but it’s been tough to get their upgraded versions so far. I also managed to upgrade a breath weapon skill set to get tier 3 and 4 breath weapons and that’s been overpowered so far. Examples: Drake Slime, Ham Shamwitch (wizard pig), Meowgician (cat wizard).
Every outdoors area has seasons and I’m unsure if they’re a net good or bad so far. The aesthetics part has been great. Like a fiery area where in one season it’s raining fire (no damage to you). There was a candy/sweets area where sometimes it was raining gumdrops.
Gameplay-wise seasons have different features. E.g. In winter any liquid freezes and you can walk over it to small side areas. They marked season-specific events on the map which has been a great QoL feature. Different monsters can also appear in different seasons.
My issue is waiting for seasons. If I’m done with a season or want a specific one I often have to wait. If there was an item to instantly switch the seasons that would be amazing. Maybe there’ll be one at some point.
Past DQM’s had one arena but this one has two: the Endor Colosseum which also appeared in DQ4, and Nadiria’s Maulosseum. I haven’t noticed a huge difference between the two other than Endor’s announcer acts like a boxing announcer and the Maulosseum one clearly wants blood.
But there have been some decent challenges in them. In particular, rounds that follow the small-large-small mold get my attention. Monsters all have a size and so far 99% have been small, which seems to be the standard size. Large monsters take up two roster spots but have great stats and seem to always be able to act twice. The first one I saw was in Endor featuring a Bag o’ Laughs and Jailcat as the small monsters and a Flython (snake with wings) as the large. On my first try the Flython poisoned my whole team with Poison Breath, which dug away at their HP as the fight went on. Its attacks and Fire Breath further eroded their HP and they didn’t have the offense to win on time.
Category D in both arenas was a noticeable step up. Monsters were doing a bunch of damage even with standard attacks. On my first try I could barely get past the second round so I left it for later. I came back with my Ham Shamwitch and its Deep Breather skillset, the one with high tier breath weapons. Blessed Breath did about 50% of their HP and confused a bunch of them.
Exploring Nadiria
Nadiria is broken up into Circles and Echelons. I’ve only been to the Lower Echelon of any area so far. The first one, the Circle of Conquest, is a swampy, dark area with lots of zombie monsters. The Circle of Temper is a fiery area with volcanos and lava. The Circle of Indulgence is an amusing area made of sweets and filled with monsters that look like pastries. The Circle of Fortitude is an industrial wasteland that I find fascinating to explore.
This part is where the usual DQ storytelling occurs. One-off bits where Psaro helps monsters or finds pieces of the Secret of Evolution. And there’s generally a boss for every Circle. One notable fight was when Psaro was getting some Penteractic Crystals. One crystal pile ended up being a Golem made out of the stuff. The fight went standard at first, we me debuffing it. The debuffs wore off and it went into Frenzy mode. That gives an attack buff and an extra turn. Suddenly the Golem was very dangerous. I couldn’t outheal its damage so all I could do was switch members in and go all out to damage race it.
Psaro’s mother is a human and his father is Randolfo the Tyrant, Master of Monsterkind in Nadiria. Psaro and his mother have been in hiding from Randolfo’s minions. Psaro’s mother, Miriam, wants him to embrace his human side and be a good person. But she’s very sickly.
Psaro and his mother live near a human settlement. Psaro tries to befriend a boy and helps stand up to some bullies with him. The two are attacked by monsters and Psaro is forced to use his superhuman strength. The boy becomes afraid and realizes Psaro has monster blood. He goes on to lead a mob to Psaro’s house and it’s torched. Psaro and his mother escape but his mother dies soon after. So we see the beginning of Psaro’s resentment of humanity.
But greater still is Psaro’s resentment of his father. Psaro goes to Nadiria to challenge his father. But Randolfo regards Psaro as a mere nuisance. Rather than kill Psaro, he puts a curse on Psaro that stops Psaro from harming any with monster blood.
Psaro flees to a village called Roseville. The villagers, made up of dwarves and monsters, take him in. But Randolfo’s minions continuously attack the village. A villager named Monty teaches Psaro how to become a monster wrangler and train monsters. Psaro’s monsters will be able to fight for him.
Psaro begins fighting in the arenas at Endor and in Nadiria in the Maulosseum. After a bout in Endor the humans bring out an elf. They reveal that the elf cries ruby tears and begin abusing her. Psaro helps the elf. Elves don’t give each other names so Psaro calls her Rose, after the village that helped him. Rose is grateful and wants to help Psaro break the curse on him.
Psaro and Rose run into a devious human named Toilen Trubble. Toilen is the name of a minor NPC from DQ5 who teaches the hero a couple spells, most notably the Zoom spell (teleport to previously visited areas). DQ5 takes place in the far distant future to DQ4 so time will tell if this younger Toilen Trubble is the same character. Anyway, young Toilen is a troublemaker who Psaro doesn’t trust at first but after helping Psaro the Dark Prince allows Toilen to travel with him.
Psaro meets a Meowgician named Furgil who begins to guide him. He says Psaro is too weak to challenge his father but with something called the Secret of Evolution he could succeed. Furgil later reveals he’s working for Aamon. In DQ4, the Secret of Evolution was how Esturk became as powerful as he is, several monsters use it to grow their strength, and then Psaro uses it to assume his final forms. Aamon is the treacherous advisor to Psaro who gets Rose killed to convince Psaro to go all in on the Secret.
Psaro travels the Lower Echelon of Nadiria, exploring the different Circles, helping monsters in need, and gaining strength. Furgil guides Psaro to Professor Helix Helix, who is studying the Secret of Evolution. Psaro begins carrying out jobs for the professor.
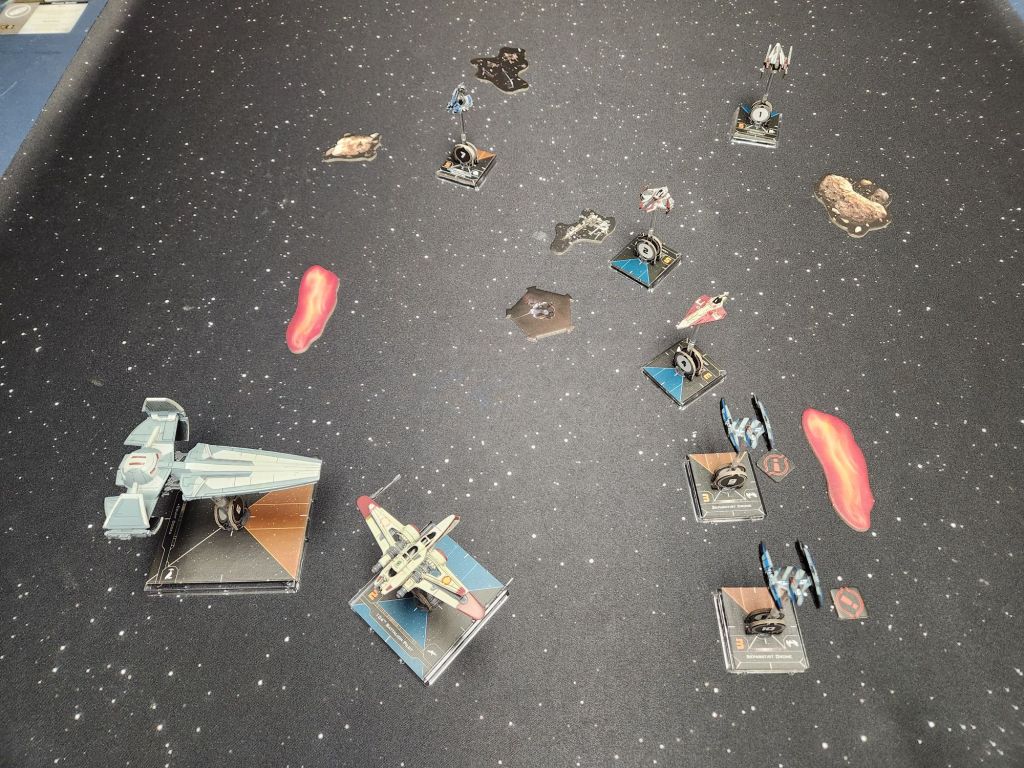
I’m aiming towards the Siege of Coruscant so collecting more ships that go into that scenario. V-Wing is a cool looking ship that looks like another proto-TIE, and its engine is even a TIE. Sith Infiltrator is briefly seen in Phantom Menace flown by Darth Maul.
Ship Thoughts
Nimbus-class V-Wing – It’s a decent ship. It has a good dial and three agility making it seem like an interceptor. It doesn’t have the double-reposition like an A-Wing though. It can drop bombs which gives it something interceptors don’t have. It strangely doesn’t have a side turnaround and has a red barrel roll.
Sith Infiltrator – Big ship so lots of shields and hull but one agility. Also doesn’t have a back or moving arc which I would’ve thought would cause problems but it actually wasn’t too bad in my practice. Probably because it has some decent turnarounds. It can potentially be built to buff droids with a Tactical Relay slot but I did a poor job of that.
Legacy 2.0
It’s been a bit since I did full lists using Legacy 2.0 rules. I also didn’t feel like busting out a bunch of extra cards and trying to track everything. Of course, even with less cards I still forgot a bunch of stuff and made mistakes, like putting Brilliant Evasion on Dooku in the Infiltrator which does almost nothing.
The action started quickly. The goal for the Republic was to have the slower ARC-170 and Torrent go slow while the faster ships sped around to flank the Seps. The Seps wanted to be aggressive and stay grouped. This led to shots and even a hit on Round 1. It was a close match throughout with neither side pulling away.
Wat got taken out on Round 2 due to being towards the middle and thus getting the Jedi and Contrail hitting him. Odd Ball also got taken out Round 2 due to taking a bunch of attacks including Dooku range 1 with a lock and Force.
Last post I was worried about getting bullseye with the Actis but having high initiative makes it possible for me. Aayla got a few bullseyes. I used Outmaneuver for the first time in a while since it’s far cheaper in 2.0 than 2.5. And maybe 2.5 got it right because it’s really powerful. Contrail got it in a few times and was a menace with it, even with only two attack dice.
Dooku in his big ship with three attack dice was a constant contributor but the big ship still had some issues. Getting around the obstacles in the middle was tough. Jedi Knight also spent a few turns ahead of him blocking him. So it was only fitting Dooku finished Knight off later.
After a few rounds of missing and fancy flying the ships converged again and started taking each other out. Knight went out, then Phlac. Couple turns later Aayla and the Drones were taken out. This left Contrail and 104th vs. Dooku.
Dooku had more HP left and outlasted 104th. Contrail probably should’ve been running circles around Dooku but I got over-aggressive and so Dooku got some shots in. Contrail also had some bad luck on shots. They both came down to 1 HP. Contrail ended up getting a range 2 Outmaneuver to finish Dooku.
Match Pictures
SetupAfter Round 1After Round 2 – Wat and Odd Ball outAfter Round 3After Round 4 – Dooku bumps beginAfter Round 5After Round 6After Round 7 – Knight outAfter Round 8 – Phlac outAfter Round 9 – Aayla and top Drone outAfter Round 10 – Last Drone outAfter Round 12 – 104th outAfter Round 14 – Both down to 1 HPAfter Round 15 – Republic wins